[This is Jim again, two weeks in a row. Another one and I am taking up knitting and changing the name of this site to Jimcraft]
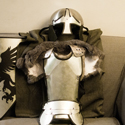
So I thought I'd just share some pictures of the leather armor I made for the kids in progress. I'm terrible about following how-to's or tutorials so I'm afraid I'm not very good at writing them. For my son's armor I bought a scrap remnant of 9 oz vegetable-tanned leather for about $15.00. I cut a piece of cardboard into the shape of a breastplate and fit it on my son, then used that as the pattern to cut the leather. I carved the dragon into the leather (after using a sponge to wet the leather a bit) and then soaked it in the tub (using hot but not boiling water). After it was well soaked I took it out, put it back on the cardboard form and cooked it for a while at 150 degrees. When it was done, it was rock hard and ready to be dyed. I used a "forest green" dye for the dragon and the stamped edge:
The brown color is what the veg-tanned leather looks like in its natural state. Then I used several applications of black dye on that part:
While the front piece was drying, I cut a back piece out of a thinner (3-4 oz) veg-tanned black leather. I soaked, shaped, and cooked it to fit the boy's back, then attached the two pieces with old belts.
* * * * *
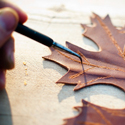
For most of my daughter's wood elf armor, I used an already-dyed remnant of 3-4 oz. veg-tanned leather. It cost about $6. From the biggest piece of the leather I cut the breastplate and molded it into shape just like I did with the back of her brother's armor. While it was hardening, I cut out dozens of little leaves from the remainder of the leather, as well as two oak leaves (all from the same leather). With some of the scraps from the heavier 9 oz leather we made six green maple laves. Four of them would become the shoulder pads, and two would go down with the oak leaf faulds.
After the leaves were carved, I laid them over cardboard tubes and cooked them until they had a bit of shape. Then I applied a layer of molten beeswax to harden them. I attached each leaf to the breastplate using single rivets, then added an old belt for waist and shoulder straps.

















0 comments
Post a Comment